The Art of Planting Caladiums
Share
The Art of Planting Caladiums: A Guide to Growing Indoors and Outdoors
Caladiums are beloved for their bold, vibrant leaves that bring a splash of color to both gardens and indoor spaces. But when it comes to planting caladium bulbs, there’s often a bit of confusion about how to orient them correctly — especially when you spot that curious white paint on some of the bulbs. Let’s walk through everything you need to know to ensure your caladiums are planted properly, whether you’re starting them indoors or outdoors.
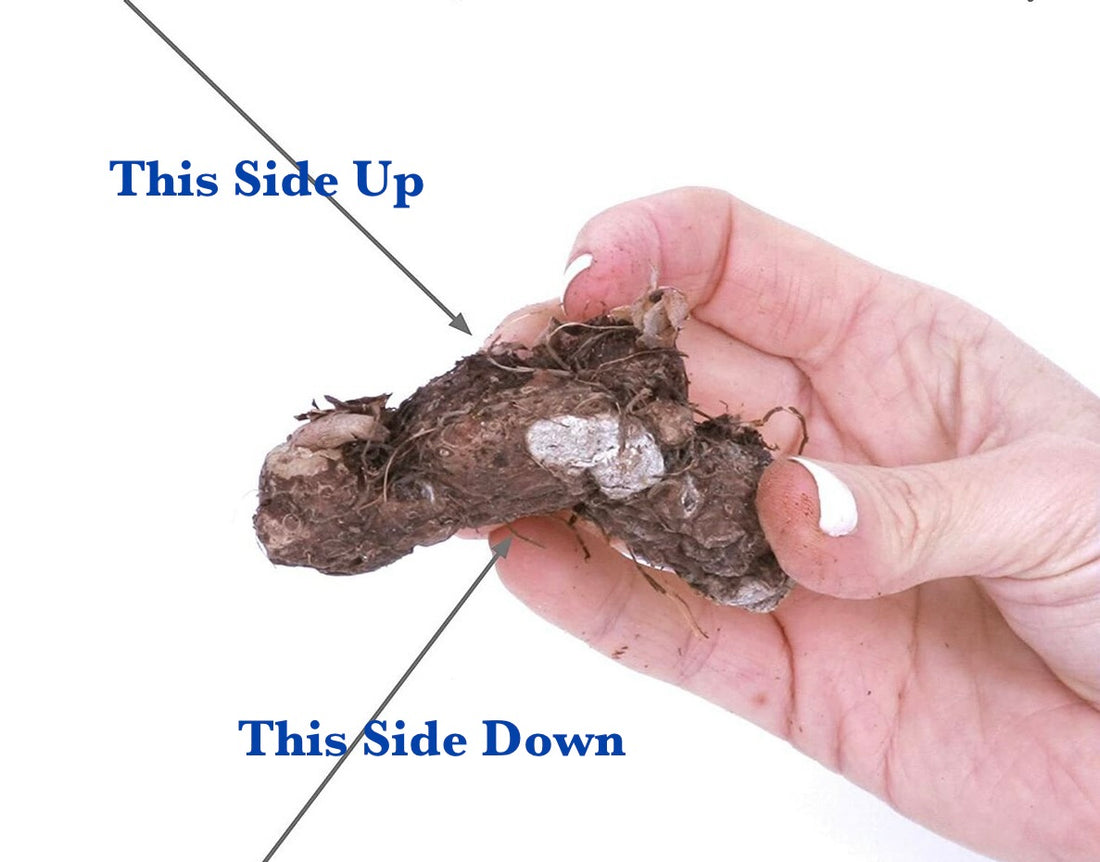
Understanding Caladium Bulbs: Which Side Goes Up?
Caladium bulbs, also called tubers, aren’t perfectly round like other flower bulbs. They have an irregular shape with distinct features that can help you determine the correct planting orientation.
Here’s a quick breakdown:
-
The top of the bulb is where the eyes (growing points) are located. These are small, bumpy, or slightly raised areas from which the leaves will sprout.
-
The bottom of the bulb is typically smoother and flatter.
In some cases, you may notice white paint on the bulb. This paint is an indicator provided by growers to mark the top side of the bulb, making it easier for you to plant it correctly.
How to Identify the Top and Bottom of a Caladium Bulb:
-
Look for the Eyes: The eyes are tiny growth points that will eventually sprout leaves. These should always face upward when planting.
-
Check for the White Paint: If your caladium bulb has white paint on it, that’s a clear sign that this is the top side. The painted side should face upward.
-
Feel the Texture: The bottom of the bulb will be smoother and less bumpy compared to the top, which has raised eyes.
Planting Caladiums Outdoors
Caladiums thrive in warm, humid environments, making them a favorite for shady garden beds, borders, and containers. Here’s how to get your outdoor caladiums off to a great start:
Step-by-Step Outdoor Planting Guide:
-
Wait for Warm Weather: Caladiums are tropical plants and prefer soil temperatures of at least 65°F (18°C). Plant them outdoors only after the risk of frost has passed.
-
Prepare the Soil: Caladiums like well-draining soil that’s rich in organic matter. If your garden soil is heavy or clay-like, consider amending it with compost or peat moss.
-
Plant the Bulbs:
-
Depth: Plant the bulb about 2 inches deep.
-
Spacing: Space bulbs 8-12 inches apart, depending on the variety and the look you want to achieve.
-
Orientation: Ensure the eyes or painted side face upward.
-
-
Water Gently: After planting, water the area thoroughly but gently to help the soil settle around the bulbs.
-
Mulch: Add a layer of mulch to retain moisture and keep the soil warm.
Outdoor Care Tips:
-
Watering: Keep the soil consistently moist but not soggy. Caladiums don’t like to dry out.
-
Light: Most varieties prefer partial to full shade, though some newer varieties can tolerate more sun.
Starting Caladiums Indoors
For those in cooler climates or who want to get a jump on the growing season, starting caladiums indoors is a great option. Here’s how to do it:
Step-by-Step Indoor Planting Guide:
-
Choose Your Containers: Use small pots with drainage holes to prevent water from sitting at the bottom.
-
Use Well-Draining Potting Mix: Choose a light, airy potting mix that retains moisture without becoming waterlogged.
-
Plant the Bulbs:
-
Depth: Plant the bulb about 1-2 inches deep.
-
Orientation: Make sure the eyes or painted side are facing upward.
-
-
Water Lightly: Water the potting mix just enough to moisten it. Avoid overwatering, as the bulbs can rot.
-
Place in a Warm Spot: Caladiums need warmth to sprout. Keep the pots in a warm location, ideally between 70-85°F (21-29°C).
-
Provide Light: Once the bulbs sprout, place them in a bright, indirect light location. Avoid direct sunlight, which can scorch the leaves.
Transitioning Caladiums from Indoors to Outdoors:
If you’ve started your caladiums indoors and want to move them outside, wait until the weather has warmed up. Gradually harden off the plants by placing them outside for a few hours each day over the course of a week to help them adjust to outdoor conditions.
Common Mistakes to Avoid
To ensure your caladiums thrive, steer clear of these common planting mistakes:
-
Planting Upside Down: Always make sure the eyes or painted side are facing upward. Planting upside down will delay sprouting.
-
Planting Too Early: Don’t plant outdoors until the soil is warm enough. Cold soil can cause the bulbs to rot.
-
Overwatering: Caladium bulbs are susceptible to rot if overwatered. Keep the soil moist but not soggy.
-
Too Much Sun: Most caladiums prefer shade or dappled sunlight. Avoid placing them in direct sun unless you have a sun-tolerant variety.
Why the White Paint?
The white paint on caladium bulbs is a helpful guide from growers to indicate the correct planting orientation. It’s not harmful to the plant and can make the planting process much easier, especially for beginners.
If your bulb doesn’t have paint, don’t worry! Just look for the eyes or feel for the textured, bumpier side to determine which side goes up.
Final Thoughts: A Burst of Color with a Little Patience
Planting caladiums is a rewarding experience that brings bold, colorful foliage to your garden or home. By taking the time to orient your bulbs correctly and providing the right growing conditions, you’ll enjoy a spectacular display of leaves in shades of pink, red, white, and green.
Remember, every caladium bulb holds the promise of beauty — you just need to give it a little warmth, care, and patience to see it flourish. Happy planting from all of us at Blue Buddha Farm! 🌿

